For this example I used a public JSON feed from the National Centre for Text Mining in the UK (thus spellchecker yelling at me for "Centre"). They have a RESTful API that you can submit acronyms to, and it will return words that may fit those acronyms in a JSON format that looks something like this:
(Example for ABC)
[
{
"sf":"ABC",
"lfs":[
{
"lf":"ATP-binding cassette",
"freq":1437,
"since":1990,
"vars":[
{
"lf":"ATP-binding cassette",
"freq":1057,
"since":1990
}
]
}
]
}
]
{
"sf":"ABC",
"lfs":[
{
"lf":"ATP-binding cassette",
"freq":1437,
"since":1990,
"vars":[
{
"lf":"ATP-binding cassette",
"freq":1057,
"since":1990
}
]
}
]
}
]
To easily and repeatably get this data into Azure Storage, I'm going to create my own RESTful Web API in .net to assist me. To do this I'm going to create a new ASP.NET Web Application in Visual Studio:
 |
| Figure 1. ASP.NET Project |
When prompted, choose Web API:
 |
| Figure 2. Template Selection Screen |
 |
| Figure 3. Azure Storage Page |
 |
| Figure 4. Manage Access Keys |
Here you will need to grab your storage account name and primary access key for our project. We are going to need these values for our Web.config in our Visual Studio solution. Open up web config and add values in <appSettings>
<appSettings>
<add key="StorageConnectionString" value="DefaultEndpointsProtocol=https;AccountName=jymbo;AccountKey=wWlWqJoG+sZou5m/..." /></appSettings>
The second place we need to edit is <connectionStrings>
<connectionStrings> <add name="StorageConnectionString" connectionString=
"DefaultEndpointsProtocol=https;AccountName=jymbo;AccountKey=wWlWqJoG+sZou5m/..." />
</connectionStrings>
To be able to write to cloud storage we'll need to add some namespaces to our project. For

this we can use NuGet. Right click on the project and click Manage NuGet Packages:


Figure 5. Manage NuGet Packages


Do a search for Windows Azure Storage, click install to add to your project.


Figure 6. Windows Azure Storage


We can finally start coding! Now we need to add a controller to our project that can accept inputs to


our API:
 |
| Figure 7. Add Controller |
Choose Web API 2 Controller - Empty:
 |
| Figure 8. Controller Type |
For this example I named my controller BlobController:
 |
| Figure 9. Controller Name |
In BlobController.cs paste this code:
using System;using System.Net;using System.Web.Http;using Microsoft.WindowsAzure;using Microsoft.WindowsAzure.Storage;using Microsoft.WindowsAzure.Storage.Auth;using Microsoft.WindowsAzure.Storage.Blob;using System.IO;namespace JSONBlobStorage.Controllers{public class BlobController : ApiController{CloudBlockBlob blockBlob;string wUrl = "http://www.nactem.ac.uk/software/acromine/dictionary.py?sf=";string jsonString;// GET: api/Blob/5public string Get([FromUri]string acronym){ConnectToAzure(acronym);LoadJSONTOBlobStorage(acronym);return "File containing JSON for acronym "+acronym+" has been uploaded";}private void ConnectToAzure(string acronym){// Retrieve storage account from connection string.CloudStorageAccount storageAccount = CloudStorageAccount.Parse(CloudConfigurationManager.GetSetting("StorageConnectionString"));// Create the blob client.CloudBlobClient blobClient = storageAccount.CreateCloudBlobClient();// Retrieve a reference to a container.CloudBlobContainer container = blobClient.GetContainerReference("jymbo");// Create the container if it doesn't already exist.container.CreateIfNotExists();// Retrieve reference to a blob named "Acronym*".blockBlob = container.GetBlockBlobReference("acronym/"+acronym+".txt");}private void LoadJSONTOBlobStorage(string acronym){HttpWebRequest httpWReq = (HttpWebRequest)WebRequest.Create(wUrl+acronym);HttpWebResponse httpWResp = (HttpWebResponse)httpWReq.GetResponse();//Test the connectionif (httpWResp.StatusCode == HttpStatusCode.OK){Stream responseStream = httpWResp.GetResponseStream();//Set jsonString using a stream readerusing (StreamReader reader = new StreamReader(responseStream)){jsonString =reader.ReadToEnd();}//Place top level array in an object ajsonString = "{\"a\":" + jsonString.TrimEnd('\r', '\n') + "}";//Upload JSON to blob storageblockBlob.UploadText(jsonString);}}}}I did not add any exception handling, as this was only for demonstration purposes. We have a Get
that will accept an acronym parameter that we want to pass to the acronym API, a ConnectToAzure
method to will authenticate us to Azure blob storage and a LoadJSONTOBlobStorage method that will
pull the JSON from the RESTful API and upload it to blob storage. You'll notice that I read the stream
into a string and concatenate the JSON with { a: .. }. This is to wrap the top level array we receive in
an object so our JSON will be easier to manage when we deserialize:
{

   "a":[

      {

         "sf":"ABC",

         "lfs":[

            {

               "lf":"ATP-binding cassette",

               "freq":1437,

               "since":1990,

               "vars":[

                  {

                     "lf":"ATP-binding cassette",

                     "freq":1057,

                     "since":1990

                  }

               ]

            }

         ]

      }

   ]

}
If I did not need to edit the JSON before storage, I could have called blockBlob.UploadFromStream(responseStream);
, passed the stream and got the same results. I got the code for the Azure authentication here. This example is
using C#, but there are a couple other examples using other languages in that post.
Now we need to publish this project to Azure. Right click the project and choose Publish:
 |
| Figure 10. Publish |
On the Publish Web screen select Microsoft Azure Web Apps:
 |
| Figure 11. Publish Web Screen |
This will prompt you to log into your Azure account. When prompted for existing or new, click the New button:
 |
| Figure 12. Existing Web App Screen |
Then enter a name for your web app and click Create:
 |
| Figure 13. Choose App Name Screen |
You will then go through a series of screens to validate your entries, here you can just click the Publish
button to create your site. Your Output window should be giving you a status of what is being pushed up to
Azure. When completed you should see something like this:
 |
| Figure 14. Output Window |
Once completed your site should launch in your browser. Now we're ready to load some JSON to Azure Storage.
The API takes a single parameter for the acronym. Once we pass this parameter the Web API will call the RESTful
web service, return our JSON and upload it to Azure Storage.
To test it out we can call http://jsonblobstorageexample.azurewebsites.net/api/Blob?acronym=abc. Which
should upload a JSON file for acronym data for ABC and produce the following ugly message:
<string xmlns="http://schemas.microsoft.com/2003/10/Serialization/">File containing JSON for acronym abc has been uploaded</string>If we look in our Azure storage account we should now see that file:
 |
| Figure 15. Azure Storage |
We can use our server explorer in Visual Studio to download the file and verify the contents:
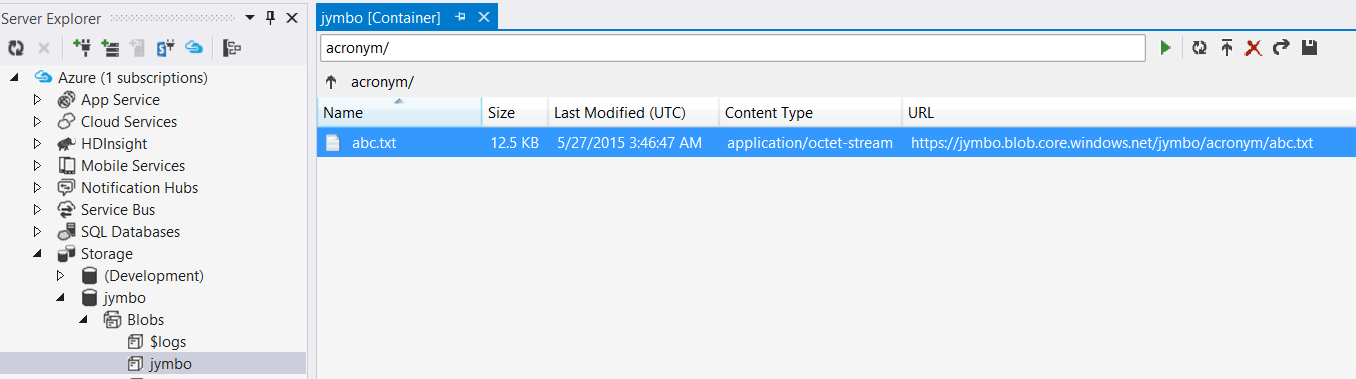 |
| Figure 16. Visual Studio Server Explorer |
Hit the Save As Button and open in a local directory:
 |
| Figure 17. Download File from Blob Storage |
 |
| Figure 18. abc.txt Contents |
Keep in mind that whenever you pass abc it will overwrite the existing abc.txt file in blob storage. This
example could always be expanded on to pass a file name parameter to get around this if desired. If you
pass parameter xyz for acronym, it will create a blob called acronym/xyz.txt and so on.
Really nice blog post.provided a helpful information.I hope that you will post more updates like this
ReplyDeleteAzure Online Course Hyderabad
This comment has been removed by the author.
ReplyDeletevery useful information, the post shared was very nice.
ReplyDeleteMS Azure Online Training
I’m definitely going to look into it. Really very useful tips are provided here. Thank you so much. Keep up the good work تحويل الصور الى pdf
ReplyDeleteYou have worked to perfection on this article. Thanks for taking the time to post search valuable information. I Recommendation this
ReplyDeleteOracle Training in Chennai | Certification | Online Training Course | Oracle Training in Bangalore | Certification | Online Training Course | Oracle Training in Hyderabad | Certification | Online Training Course | Oracle Training in Online | Oracle Certification Online Training Course | Hadoop Training in Chennai | Certification | Big Data Online Training Course